Monday 23 December 2013
Monday 12 August 2013
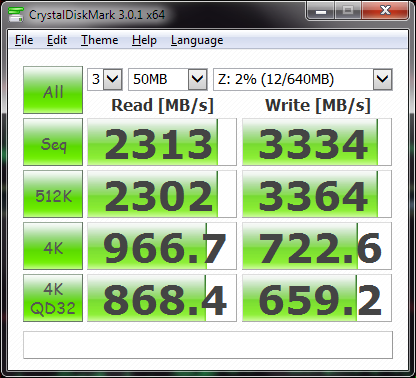
performance comparison ramdisk vs ssd
ok being the performance freak that I am, I wanted to know how much faster is a ramdisk vs an SSD (if it is at all of course). So I compared my ramdisk running on BondDisk, vs my Samsung 840 Pro (which runs at almost half speed thanks to my laptop having only SATA 2 :/)
The results leave no room for doubt... ramdisk all the way, for performance critical applications... almost 10 times faster... now if only BondDisk could create a bigger ramdisk...

The results leave no room for doubt... ramdisk all the way, for performance critical applications... almost 10 times faster... now if only BondDisk could create a bigger ramdisk...
Ramdisk (BondDisk)
Samsung 840 Pro on SATA2
Monday 5 August 2013
svn 1.8 upgrade working copy
So I have decided to update my tortoise svn from 1.7.x to 1.8.1 today, and I couldn't use the working copies as the new client is not backwards compatible. Turns out that I just had to restart my computer to complete the installation (duh) and after that there was a new option available when right clicking on the old format working copy:

Selecting the first option, shows the following window:
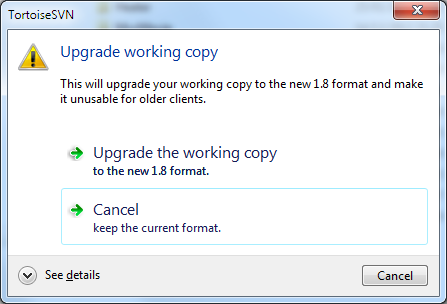
All we have to do is to choose the first option, and our old working copy is upgraded to the new 1.8.x format.
Please note that this is a one way operation, so once you upgrade you can't go back to 1.7.x
Happy coding
Selecting the first option, shows the following window:
All we have to do is to choose the first option, and our old working copy is upgraded to the new 1.8.x format.
Please note that this is a one way operation, so once you upgrade you can't go back to 1.7.x
Happy coding
Friday 2 August 2013
move avira logfile location
so since it seems impossible to move the file location (means change the settings in avira that determine where the logfiles is located by default), and I have an SSD that I want to protect from too many writes, I am using my ramdisk on drive Z:
first I had to stop avira real time scan, and create the directory z:\temp\avira\logfiles
then I moved all the files from the default avira logs directory C:\ProgramData\Avira\AntiVir Desktop\LOGFILES to the ramdisk folder
then I deleted the default avira logfile location, and created a symbolic link instead:
mklink /D "C:\ProgramData\Avira\AntiVir Desktop\LOGFILES" z:\temp\avira\logfiles
This seems to work and I don't see many avira logfile writes in process monitor any more.
Would have been possible to move the windows temp folder setting to the ramdisk, but then we would have to keep backing this up on hard disk at shut down (or even periodically if we are afraid of power cut), so that the contents don't get lost between restarts, and we don't really want to do that, as it would add many more disk writes and would slow down the system in general, especially during start up and shut down.
PS: I had to modify my ramdisk to always load a fixed image at start up, which contains the above path. Otherwise, at initialisation, the ram drive is always empty, and then avira can't find its temp file, which means it can't start its real time scanner.
Sunday 28 July 2013
Asus X52F laptop overheating clean fan and speakers losing sound when laptop gets hot but headphones still playing back sound
Before cleaning:
After cleaning:

It's been a while since I made a post... well, I've been busy plus I didn't have anything interesting worth bloging about... but this time it's different.
I've had this Asus X52F laptop for almost 1 year and 9 months now. It's been performing quite well despite being based on an intel core i3, which by todays standards is a bit underpowered.
I did upgrade the memory from 4 to 8 GB last year as it was very cheap, easy, and definitely worth it, as I saw noticeable improvement in performance. I am using half a gig as a ramdisk with the excellent Bond Disk (I just wish it had the ability to use a bit more... ). Still, the ramdisk is used as temp directory, also stores the firefox cache and profile, and a few other temporary files as needed.
I also have a permanent 8 GB memory card in the memory card reader, half of which I use for ready boost, and the other half is spare - I am not really using it for anything, but it's there as a fast memory if needed.
Now to the core of the problem, and the solution. The laptop has been overheating for quite some time now, yet, I had not managed to find an easy way to resolve this problem. I did open the back a couple of times and tried to hoover the fan (having stabilised it first with a pencil, so that it does not get destroyed), but this didn't seem to make any noticeable improvement. It just seemed hard to remove or clean. Which it wasn't... So, recently, I decided that I really had to do something about it as it was getting out of hand.
Also, since a couple of months ago I noticed that the sound of the speakers was getting muted after a few minutes of operation, even though the headphones connected to the jack still managed to playback sound. I believe this was caused by overheating. The other symptom was that when the speakers stopped reproducing sound, if I plugged in the headphones and I removed them again, the sound was back, but only for a few seconds. The same happened if I muted and un-muted the main volume control.
I must say that this has nothing to do with drivers or settings, I did spend several hours trying all possible solutions and combinations of settings, without success.
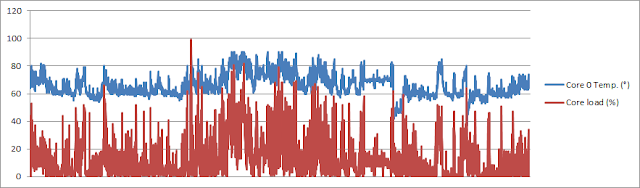
Now back to the overheating problem. First I downloaded the excellent tool Core Temp, and the plugin called Core Temp Grapher (in the addons page) - big thanks to the authors of this tool that allows us to log and see temperature and CPU load data over time.
I set Core Temp to log the temperature data for a couple of days, during normal laptop operation. This means web browsing, some software installation/uninstallation, watching youtube clips and reading documents.The results were pretty bad (I will include graphs and data soon below).
Then, after a bit of google searching, I came across this awesome detailed guide, explaining how to disassemble several parts of the laptop. I really can't thank the author enough for putting this together, huge kudos.
In reality, we don't need all those steps, for our purpose of resolving the overheating problem. What we do need is:
In summary:
We shut down the laptop
We remove the power supply
We remove the battery (see guide above if you don't know how to do this)
We remove the 5 screws from the back cover, and remove the cover (see guide again if you don't know how to do this)
We then remove the 2 fan screws and the fan cable connector, then the black fan tape, and we remove the fan (see guide, it is very well explained).
Then, we look at awe at the fan air outlet metal laminates, which most likely are not even visible, cause they are totally covered with a thick layer of dust, which does not allow *any* air to flow out!
This is where we use the toothpicks to slowly scrape the solidified dust from the metal laminate. We use the hoover (preferably on low setting) to clean up, and if necessary, we use the soft paper or cloth to clean any visible excess dust in the area. We can optionally hold the fan blades still (so that we don't destroy it) and hoover the fan itself.
Once we are satisfied and have unclogged the air outlet, we put the fan back in place, screw the 2 screws, connect its power cable to the motherboard, then put back the cover, screw the 5 screws, and place the battery back on the laptop. We are ready to connect the main power and go.
It's been only a few minutes since I did all this, so I will post more details on temperature improvement a bit later, but to give you an idea:
Before the cleaning the laptop core 0 used to run between 60 and 80 degrees C, under no load to light load, and over 90 with moderate load (this was with balanced or "multimedia" power plan selected). The fan itself was struggling to keep the temperature down, without much success of course as the air outlet was totally blocked. Core 1 was similar though it is always 5-10 degrees less. But here we focus on core 0, the results for core 1 are similar.
Right now, and with about 1 hour of normal operation again, the temperatures on core 0 are around 40-50 degrees under low to moderate load, even though I am writing this having the laptop on a pillow, which is really bad for airflow. So we can see an improvement of 20-30 degrees, which is huge.
I sincerely hope this helps someone else who has the same laptop and problem. Within 5-10 minutes and with minimal work, materials, and expertise, you can brink your laptop temperatures down by a lot, which means more comfort in operation, longer life for your components/laptop, also in case your laptop shuts down due to overheating it won't do it any more, and finally, you may even resolve your problem of having the speakers muting the sound when the laptop gets hot.

After cleaning:

It's been a while since I made a post... well, I've been busy plus I didn't have anything interesting worth bloging about... but this time it's different.
I've had this Asus X52F laptop for almost 1 year and 9 months now. It's been performing quite well despite being based on an intel core i3, which by todays standards is a bit underpowered.
I did upgrade the memory from 4 to 8 GB last year as it was very cheap, easy, and definitely worth it, as I saw noticeable improvement in performance. I am using half a gig as a ramdisk with the excellent Bond Disk (I just wish it had the ability to use a bit more... ). Still, the ramdisk is used as temp directory, also stores the firefox cache and profile, and a few other temporary files as needed.
I also have a permanent 8 GB memory card in the memory card reader, half of which I use for ready boost, and the other half is spare - I am not really using it for anything, but it's there as a fast memory if needed.
Now to the core of the problem, and the solution. The laptop has been overheating for quite some time now, yet, I had not managed to find an easy way to resolve this problem. I did open the back a couple of times and tried to hoover the fan (having stabilised it first with a pencil, so that it does not get destroyed), but this didn't seem to make any noticeable improvement. It just seemed hard to remove or clean. Which it wasn't... So, recently, I decided that I really had to do something about it as it was getting out of hand.
Also, since a couple of months ago I noticed that the sound of the speakers was getting muted after a few minutes of operation, even though the headphones connected to the jack still managed to playback sound. I believe this was caused by overheating. The other symptom was that when the speakers stopped reproducing sound, if I plugged in the headphones and I removed them again, the sound was back, but only for a few seconds. The same happened if I muted and un-muted the main volume control.
I must say that this has nothing to do with drivers or settings, I did spend several hours trying all possible solutions and combinations of settings, without success.
Now back to the overheating problem. First I downloaded the excellent tool Core Temp, and the plugin called Core Temp Grapher (in the addons page) - big thanks to the authors of this tool that allows us to log and see temperature and CPU load data over time.
I set Core Temp to log the temperature data for a couple of days, during normal laptop operation. This means web browsing, some software installation/uninstallation, watching youtube clips and reading documents.The results were pretty bad (I will include graphs and data soon below).
Then, after a bit of google searching, I came across this awesome detailed guide, explaining how to disassemble several parts of the laptop. I really can't thank the author enough for putting this together, huge kudos.
In reality, we don't need all those steps, for our purpose of resolving the overheating problem. What we do need is:
- a small cross screwdriver (Philips)
- a couple of toothpicks (cocktail sticks)
- some soft paper or a cloth
- a vacuum cleaner
- Steps 1 to 3 and 9 to 11 from the guide linked above
In summary:
We shut down the laptop
We remove the power supply
We remove the battery (see guide above if you don't know how to do this)
We remove the 5 screws from the back cover, and remove the cover (see guide again if you don't know how to do this)
We then remove the 2 fan screws and the fan cable connector, then the black fan tape, and we remove the fan (see guide, it is very well explained).
Then, we look at awe at the fan air outlet metal laminates, which most likely are not even visible, cause they are totally covered with a thick layer of dust, which does not allow *any* air to flow out!
This is where we use the toothpicks to slowly scrape the solidified dust from the metal laminate. We use the hoover (preferably on low setting) to clean up, and if necessary, we use the soft paper or cloth to clean any visible excess dust in the area. We can optionally hold the fan blades still (so that we don't destroy it) and hoover the fan itself.
Once we are satisfied and have unclogged the air outlet, we put the fan back in place, screw the 2 screws, connect its power cable to the motherboard, then put back the cover, screw the 5 screws, and place the battery back on the laptop. We are ready to connect the main power and go.
It's been only a few minutes since I did all this, so I will post more details on temperature improvement a bit later, but to give you an idea:
Before the cleaning the laptop core 0 used to run between 60 and 80 degrees C, under no load to light load, and over 90 with moderate load (this was with balanced or "multimedia" power plan selected). The fan itself was struggling to keep the temperature down, without much success of course as the air outlet was totally blocked. Core 1 was similar though it is always 5-10 degrees less. But here we focus on core 0, the results for core 1 are similar.
Right now, and with about 1 hour of normal operation again, the temperatures on core 0 are around 40-50 degrees under low to moderate load, even though I am writing this having the laptop on a pillow, which is really bad for airflow. So we can see an improvement of 20-30 degrees, which is huge.
I sincerely hope this helps someone else who has the same laptop and problem. Within 5-10 minutes and with minimal work, materials, and expertise, you can brink your laptop temperatures down by a lot, which means more comfort in operation, longer life for your components/laptop, also in case your laptop shuts down due to overheating it won't do it any more, and finally, you may even resolve your problem of having the speakers muting the sound when the laptop gets hot.
Friday 1 March 2013
PayPal API related links
SDKs https://www.x.com/developers/paypal/documentation-tools/paypal-sdk-index
Main Page: https://www.x.com/developers/paypal
PayPal Labs integration wizard - not sure how good code this tool produces, but it's worth checking out https://www.paypal-labs.com/integrationwizard/ecpaypal/main.php
Getting started with Express Checkout https://www.x.com/developers/paypal/documentation-tools/express-checkout/integration-guide/ECGettingStarted
A very good overview of the PayPal API options http://www.codeproject.com/Articles/42894/Introduction-to-PayPal-for-C-ASP-NET-developers
Good tutorial using the web services API http://blog.effectlabs.com/post/2011/11/07/Paypal-Express-Checkout-with-C-using-Paypal-web-services.aspx
How to view SOAP messages http://blog.encoresystems.net/articles/how-to-capture-soap-envelopes-when-consuming-a-web-service.aspx
Some more paypal SDKs from their Australia site https://cms.paypal.com/au/cgi-bin/?cmd=_render-content&content_ID=developer/library_download_sdks
A very simple tutorial that illustrates the basic points, although it does not go to the advanced functionality, but it is useful if we want to get a first feel quickly http://www.dotnetfunda.com/articles/article928-online-payments-using-paypal-integration-with-aspnet.aspx
Sunday 24 February 2013
Tuesday 19 February 2013
RESTful web service with MVC 3 and fiddler for testing
good article here, also showing how to use fiddler to test the web service: http://www.iwantmymvc.com/rest-service-mvc3
some other good links:
video 15 min on MVC 2 http://www.asp.net/mvc/videos/mvc-2/how-do-i/how-do-i-return-json-formatted-data-for-an-ajax-call-in-an-aspnet-mvc-web-application
More focus on error handling http://www.binary-studio.com/2010/4/22/building-a-custom-json-web-service-with-aspnet-mvc
More focus on AJAX access http://msprogrammer.serviciipeweb.ro/2011/12/05/jquery-ajax-request-and-mvcdetailed/
Another simple example: http://juristr.com/blog/2011/08/posting-json-data-to-aspnet-mvc-3-web/
Almost 2 hours long video, haven't watched it yet but should be comprehensive overview https://www.youtube.com/watch?v=oRhyn45o3qE
This one uses the web API https://www.youtube.com/watch?v=t090py6b0lM
Monday 11 February 2013
wiki editor word
use this microsoft addon to be able to save word files for wiki in wikimedia format
https://www.microsoft.com/en-us/download/details.aspx?id=12298
https://www.microsoft.com/en-us/download/details.aspx?id=12298
Friday 8 February 2013
IoC
https://simpleinjector.codeplex.com/
http://www.palmmedia.de/Blog/2011/8/30/ioc-container-benchmark-performance-comparison
http://stackoverflow.com/questions/21288/which-net-dependency-injection-frameworks-are-worth-looking-into
http://www.devtrends.co.uk/blog/how-not-to-do-dependency-injection-the-static-or-singleton-container
https://timross.wordpress.com/2010/01/21/creating-a-simple-ioc-container/
http://netmvc.blogspot.co.uk/2012/04/dependency-injection-in-aspnet-mvc-4.html
Subscribe to:
Posts (Atom)